👋 Getting Started
This guide was designed with version 5.19.0 or higher and Paper 1.21.1 in mind.
Older versions or Spigot servers, will have less features and different commands. If you're using an older version or Spigot, please do your own research as the commands will be different.
I know the docs here are very incomplete and cover only 10% of what notquests can actually do. As the docs are open-source that's not my fault though, but yours, because you, or rather the community, is lazy! Shame on you!
Once you know more about notquests, you can be a chad and contribute to our documentation here (GitHub account needed, but docs can be edited right on there) - any contributions are welcome! ❤️
Let's discover NotQuests! There's two ways to get started:
- Either you keep on reading this guide
- Or watch our Video Tutorial. Note that the video tutorial was made with NotQuests v3 and some commands might be slightly different.
The Structure
A Quest in NotQuests can have different properties. Examples:
- displayName: the Quest name which players will actually see
- description: the Quest description
- limits: the maximum amount of times a player can accept, complete or fail the Quest
- and much more...
Additionally, we can attach the following to a Quest:
- Objectives: An objective is basically "something the player needs to do". Once all objectives the Quest has are completed, the Quest itself is completed.
- Requirements: These determine if the player can accept the Quest. If the player does not fulfill all requirements, they can not start the Quest. Internally, they are called conditions.
- Rewards: Should be self-explanatory! Rewards are actions which will be "executed" once the Player completes the Quest.
- Triggers: Triggers are a bit more complicated to understand. Basically, they "execute" an action once something happens.
The Commands
There are two types of commands:
/q or/notquests for Player commands. All players will have access to this command./qa or/notquestsadmin for Admin commands. We're gonna use this to make and edit our Quests!
In NotQuests, we create all our Quests with commands. No need to edit complicated configuration files!
Command Completions
Each thing you write, separated by a space, is called an argument. In the following pictures, edit, and questname are the two arguments:
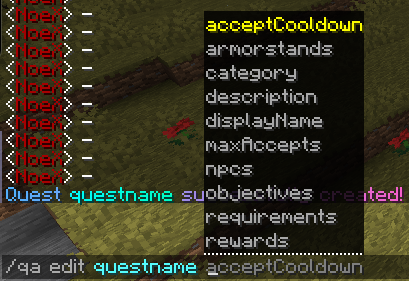
If you press space after the last argument, our intelligent command system will show you what argument comes "next". If you're stuck with a command, just make sure the last character is a space and read the command completions!
If the command completions aren't enough and you still don't know how a command works, just press enter and run the command! It will show you a help menu. Just read it, and it will tell you what arguments it needs and what they do.
Creating our first Quest
I think the best and easiest way to learn, is to learn-by-doing! So let's not waste time on boring documentations and create our first Quest:
It should then show you the following message:
![]()
1. Quest Description & Display Name
Now, the initial Quest Name cannot have any spaces. It's just an identifier for the Quest. However, we can give it a display name which can have spaces - and that's the name the player will actually see!
Next, we want to add a description to the Quest, which will be displayed in multiple places, for example if the player tries to preview or take the Quest:
Now, your players will see a beautiful description and display name after accepting the Quest:

2. Requirements
Without any requirements, every single player will be able to accept your Quest. However, that Quest we're gonna make will be quite tricky! Let's require the player to have at least 10 Quest Points until they can accept the Quest:
Quest Points can be earned by completing Quests, or they can be given out manually.
This is what Players will now see if they try to accept the Quest but don't fulfill the requirements.

In order for us to be able to test our own Quest, give yourself 10 Quest Points:
If you like NotQuests, please give NotQuests a follow on modrinth 😊 This will motivate me bring you more updates and features!
3. Objectives
Objectives are the heart of every Quest. Let's add our first one!
First, the player has to free up the road from all the shit the infected Zombies made:
This objective will be completed once the player breaks 64 dirt 👍 If you want to, you can specify multiple materials there. For example, if both dirt or stone is fine for the player to break, just enter
Now, let's add a description for that objective:
And a name:
Let's accept our Quest by using

That was easy, wasn't it?
Second Objective
Onto our next objective! The street is clear! The player should now kill all the infected villagers:
After 15 kills of Zombie Villagers, that objective will be completed! Now let's add an objective description and name:
Objective Dependencies
Now, after accepting this Quest, you will see this:
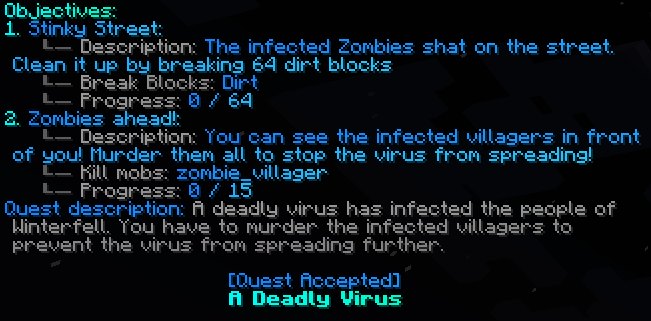
As you see, both objectives are visible. You can also complete them in no particular order.
However, we want the second Objective, "Zombies ahead!" to only be visible and complete-able after the first Objective is completed.
To accomplish that, we need to add a condition to the second objective which makes it so the player needs to complete objective 1 first. There's two ways to achieve this in NotQuests (choose just one):
- Easy way:
/qa edit TheVirus objectives predefinedProgressOrder set firstToLast . This also automatically sets the correct, same order for any future objectives you may add to this quest. - Harder way:
/qa edit TheVirus objectives edit 2 conditions unlock add CompletedObjective 1 . You'd need to set this for every single objective of that quest. However, this way may give you more flexibility.
Done! If we take the Quest now, the second objective is hidden:
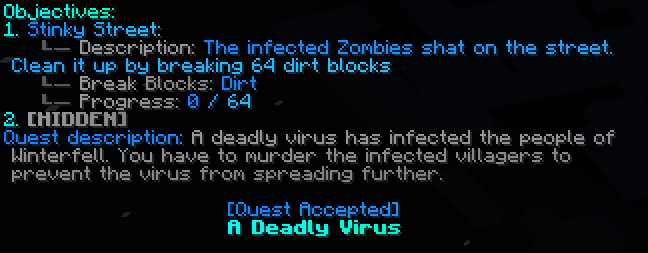
It will be unlocked once you complete the first objective 😀
4. Triggers
With Triggers, we can add some action to the Quest!
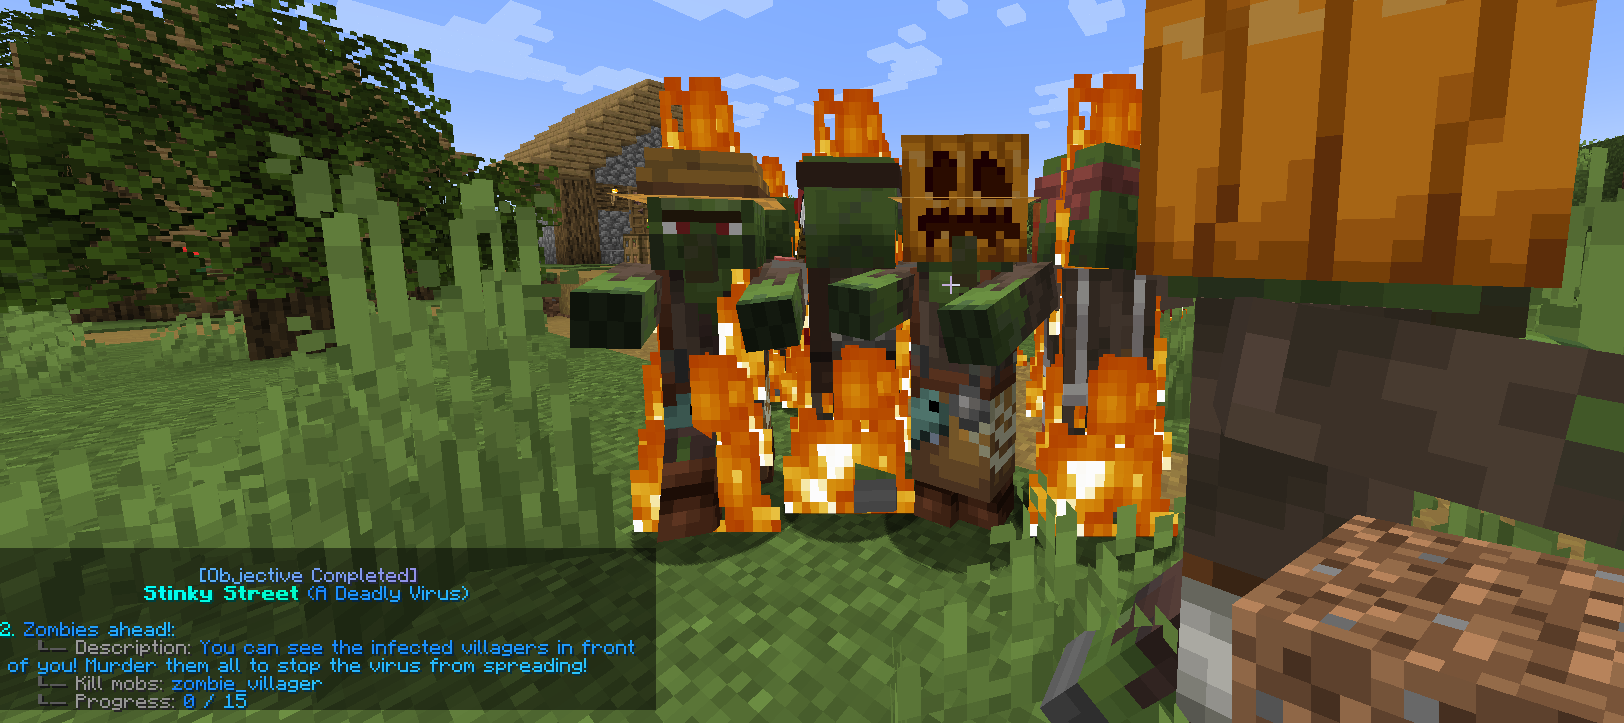
When the user reaches the second objective and has to kill the Zombie Villagers, he will notice one thing: There are no Zombie Villagers to kill. Why would they?
Let's make NotQuests spawn some Zombie Villagers for him once he reaches the second objective.
First, we need to create the action which spawns the zombie villagers. Actions can be created outside of Quests and re-used for every quest. Let's make a SpawnMob Action:
This action spawns 15 zombie villagers at the location wherever the player taking this Quest currently is 😄
Now, let's add the trigger with this action to our Quest:
This runs the action "Spawn15ZombieVillagers" once we BEGIN O2 (objective 2) in ALL worlds (not limited to any world). Feel free to test it out — it will work 👍
5. Rewards
Your players will murder you if they waste their time on this super hard Quest without receiving any rewards. So let's add some:
- +2 Quest Points:
/qa edit TheVirus rewards add QuestPoints add 2 - 2 Swords:
/qa edit TheVirus rewards add GiveItem hand 2 - For this reward, you have to hold the item in your hand while running that command. Otherwise, you can also run
/qa edit TheVirus rewards add GiveItem wooden_sword 2
- For this reward, you have to hold the item in your hand while running that command. Otherwise, you can also run
- +300 Money (if you have Vault installed):
/qa edit TheVirus rewards add Money add 300 - Want to give a reward from some other plugin via commands? You can use the {PLAYER} placeholder there. Example:
/qa edit TheVirus rewards add ConsoleCommand cr give to {PLAYER} DailyCrate 2
Reward Display Names
Once you complete the Quest, you will receive the rewards, but the player won't notice. That's because rewards are hidden (can be changed in the config) by default unless you give them a display name! So let's do that:
/qa edit TheVirus rewards edit 1 displayName set +2 Quest Points /qa edit TheVirus rewards edit 2 displayName set +2 handcrafted Wooden Swords /qa edit TheVirus rewards edit 3 displayName set +300 Coins
Done! Once you finish the Quest, you will see the rewards:
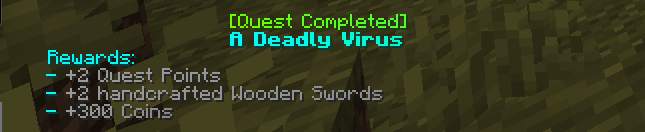
6. More Quest Settings
We don't want the player to take this Quest over and over and over and over again after they completed it. Let's limit that.
First, let's make it, so they can only accept it only when it has not been completed less than 20 hours ago:
20h = 20 hours. Now, let's give it a hard limit of 10 Quest completions. After 10 completions, the player cannot accept the Quest anymore, no matter how long they wait:
Wanna make it so they cannot accept the quest if they have failed or aborted it 3 times or more? Easy:
Alternatively, you could also prevent them from aborting the quest in the first place:
At last, let's set takeEnabled to false:
This will make it, so the player cannot take the Quest using the
7. Taking the Quest
Use
The quest is saved in the
Advanced concepts
Categories
You can group Quests together in categories. Categories are just a way to organize your Quests. Let's create a category called "Virus Quests":
Now let's move our quest to that category (by default, it's in a category called "default").
Done - that easy! Each Quest can only belong to one single category. Categories also determine the folder structure of NotQuests - and they'll even determine how it's displayed in the GUI!
Sub-categories
Each category can also have sub-categories. There can be unlimited sub-categories, and you can nest them how deep you want. Example of creating a category "Zombies" as a sub-category of "VirusQuests":
Category display names
The name we specified above is also just the categorie's identifier. You can add a display name (which is what the player will actually see). It can contain spaces, or even color codes, just like quest names! Example:
Category predefined progress order:
(todo, still need to write this up. Works like the predefined progress order for quests > objectives, but for category > quests. Super useful, this can make your life VERY easy and speed things up by a lot)
Sub-Objectives
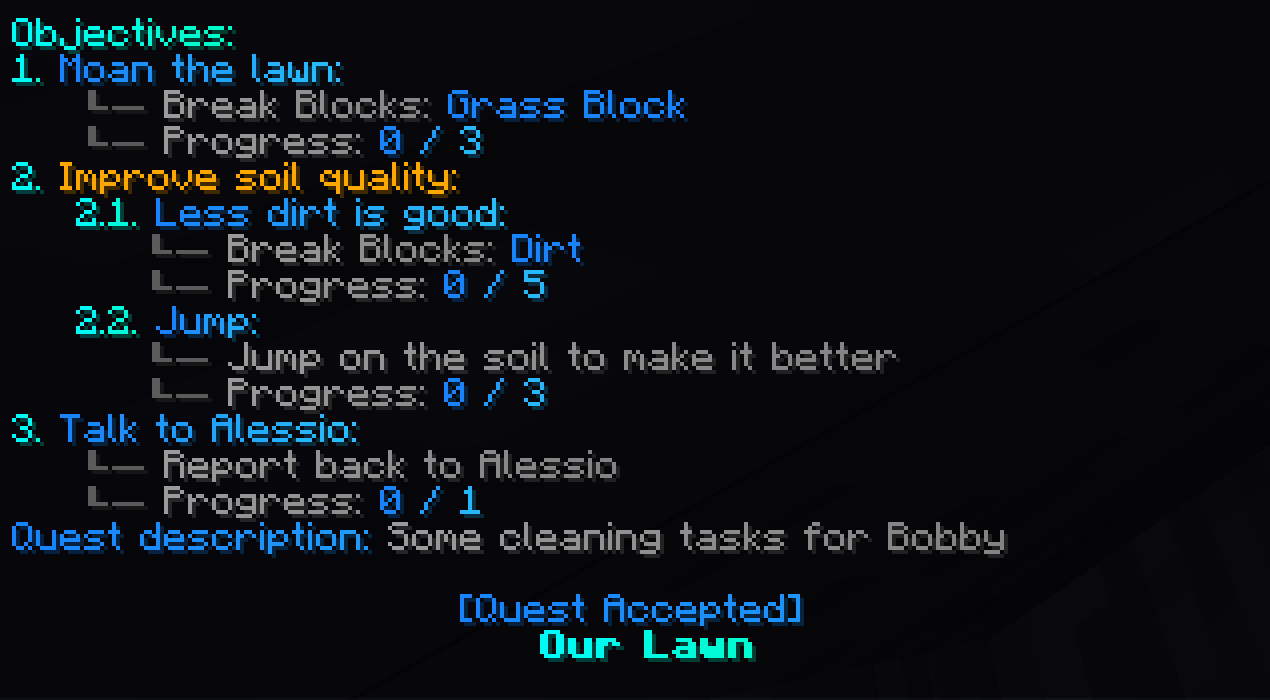
NotQuests supports sub-objectives! Each objective can have unlimited sub-objective. And each sub-objective can also have unlimited sub-sub-objectives.. and so on!
For that, there exists an "Objective" objective which is just meant as a holder for sub-objectives. In the screenshot, that would be "Improve soil quality". Although any objective can have sub-objectives.
If you add sub-objectives to an "Objective" objective, it's completed once all its sub-objectives have been completed. If you add sub-objectives to any other objective, you're only able to progress on it once all its sub-objectives have been completed.
Example:
/qa edit quest objectives add Objective "<gold>Improve soil quality" /qa edit quest objectives edit 1 objectives add BreakBlocks dirt 5 /qa edit quest objectives edit 1 objectives edit 1 displayName set Less dirt is good /qa edit quest objectives edit 1 objectives add Jump 3.0 --taskDescription "Jump on the soil to make it better"
Objective condition types
Earlier in this tutorial, we've explained how you can add objective dependencies via conditions. The command was
However, there are different kinds of conditions you can add to Objectives. This condition is an unclock condition, which determines if the objective is Hidden (= no progress is counted and you cannot complete it) or not.
However, you can ALSO add objective conditions which check if you can progress, or complete the objective. Should be super useful!
Examples:
/qa edit questname objectives edit 1 conditions unlock add Flying equals false - Unlock condition. That's what you are used to. If you are flying, the objective remains locked / "Hidden"/qa edit questname objectives edit 1 conditions progress add Flying equals false - Objective is always shown, but if you are flying, you won't get any positive progress towards it/qa edit questname objectives edit 1 conditions complete add Flying equals false - Objective is always shown and you always get progress, but it won't complete if you don't fulfill the condition
Variables as objectives
There are more possible objectives than you think there are. You can add any variable of notquests as an objective! An example would be if you wanted the objective to be "Play 100 minutes":
What if the player already played for 100 minutes already, though? Let's make it, so the player has to play 100 MORE minutes - counting from the point of accepting the quest/unlocking the objective.
This objective makes it so the player needs to play 100 MORE minutes. This is possible, as you are able to use expressions (math, other variables etc.) in many places in notquests (PlaytimeMinutes+100 is such an expression).
Imagine the possibilities! Dynamic objectives based on how much the player has already done / how strong they are / how much karma or questpoints they collected / how much they earned? An easy task with notquests!
Advanced block/material selector
Anywhere you can specify blocks/materials (e.g. the BreakBlocks objective or the GiveItem action/reward), we use our block selector. You can not only specify one single block/material there, but multiple! Here's some examples:
Yes! Finally you can make it so both kinds of diamond ore count towards the progress.
Or:
You can see why that's super useful, right?
This even works in GiveItem actions, so you could give players multiple items at once!
NotQuests expressions are actually really powerful!
NotQuests gives you the ability to make even more complex conditions much easier, if you want to. Boolean comparisons are now possible in expressions. Note: conditions can be used as quest requirements / objective conditions. They are the same.
Few examples of what's now possible:
/qa conditions add cname True equals (Money>10)&Flying This checks if you are flying AND have more than $10- Another way to do this:
/qa conditions add cname True equals Condition(Conditions:Flying&IsRich) - Or
/qa conditions add cname Condition equals Flying&IsRich
- Another way to do this:
You can also use | (or) operators or ! (negation) when using conditions in an expression.
Or:
This condition makes it so you need more than 10 + the value of the "reputation" tag multiplied by the value of the "level" tag money.
And now a very complex one:
If your "points" (from the Integer tag) are bigger or equal 4, this action will give you 40$. Otherwise, it will give you 5$. If you want to learn more about the tag system, head to the tag system guide.
NotQuests expressions like these can be used in a lot of places - so powerful!
Profiles
Every player with the permission node "notquests.user.profiles" can now create profiles in notquests! 🔥 Each profile has their own quest points, tags active & completed quests etc. This would allow players to start over if they want to, in order to choose a different path, do a speedrun or just to experience your RPG again - or whatever else!
Showing all your current profiles:
What next?
Now, start making Quests! On this website, you can find further information about NotQuests and help if you check out the Documentation tab on the top of this page. If you need any help, feel free to join our Discord.